Whipped Sugar Scrub Recipe: Unlock Silky Smooth Skin
Are you tired of skin that feels rough and dry? Our whipped sugar scrub recipe might be the perfect solution for you! This easy-to-make scrub can help you achieve silky smooth skin with ingredients you likely have at home.
- Homemade and natural ingredients
- Quick and easy preparation
- Instant smooth and soft skin results
Moreover, this scrub not only smoothens but also moisturizes. So, why buy expensive scrubs when you can whip up your own? Also, for those looking to boost their energy in a delicious way, check out our Smoothie King Strawberry Hulk recipe.
Now, let’s dive into how you can make this delightful scrub. Get ready to pamper your skin like never before!

Getting Started with Whipped Sugar Scrub
Have you ever wondered how to craft sugar scrub at home? It’s surprisingly simple and accessible! Whether you’re a DIY novice or a seasoned crafter, making your own whipped sugar scrub is an enjoyable and rewarding project.
Essential Tools and Ingredients
Before you start your DIY sugar scrub project, gather a few basic kitchen tools:
- A large mixing bowl
- A hand mixer or a stand mixer
- Measuring cups and spoons
- A spatula for mixing
These tools are probably already in your kitchen, making it easy to make whipped sugar scrub without extra shopping. Now, let’s assess the difficulty level. This project is perfect for beginners but also fun for more experienced DIYers. The process is straightforward, with no special skills required.
For detailed steps and more creative ideas, you can explore this comprehensive whipped sugar scrub tutorial. It will guide you through each stage of the project, ensuring your first batch is as delightful as it is effective.
Ready to start? Let’s make your first batch of homemade whipped sugar scrub today!
Essential Ingredients for Whipped Sugar Scrub
Now that you’re equipped with the know-how, let’s pivot to what you’ll need to bring this whipped sugar scrub to life. Choosing the right ingredients isn’t just about what you have on hand; it’s about crafting a blend that nurtures and benefits your skin. Whether you’re a DIY novice or a seasoned pro, these ingredients are simple to source and pivotal for making your non-greasy sugar scrub recipe a success.
What You’ll Need
- Granulated Sugar: The star of our scrub for its excellent exfoliating properties. For a gentler scrub, substitute with brown sugar, ideal for sensitive skin sugar scrub formulations.
- Coconut Oil: Provides the creamy, whipped base and moisturizes without leaving a greasy feel. Perfect for a non-greasy sugar scrub recipe.
- Olive Oil: Packed with antioxidants, it helps to hydrate and protect the skin. Alternatively, almond oil can be used for its additional nourishing benefits.
- Honey: A natural humectant that draws moisture into the skin, enhancing the hydrating properties of the scrub.
- Lemon Juice: Adds a fresh scent and has natural astringent properties that can help to brighten the skin.
- Vanilla Extract: For a soothing aroma that makes your skincare routine feel like a luxurious spa experience.
- Vitamin E Oil (optional): An optional but recommended addition for its skin-healing properties, especially beneficial in natural skincare recipes.
Each ingredient not only serves to create the perfect consistency but also brings its own unique skin benefits. Are you ready to mix these up and see the magic happen? Creating your own natural skincare recipes at home is not only rewarding but also ensures you know exactly what’s touching your skin.

Step-by-Step Guide to Making Whipped Sugar Scrub
Now that you’ve got all your ingredients ready, let’s dive into the exfoliating sugar scrub guide. Making your own luxurious whipped scrub isn’t just rewarding, it’s also incredibly fun. Follow these steps to achieve a perfectly whipped texture that’s sure to leave your skin glowing and feeling smooth.
- Combine the Ingredients: Start by mixing the granulated sugar, coconut oil, and olive oil in a large bowl. Ensure that the sugar is evenly coated with the oils for a consistent texture.
- Add Extras: Stir in the honey, lemon juice, and vanilla extract. These ingredients not only add fragrance but also have skin-soothing properties, making your recipe for glowing skin scrub even more potent.
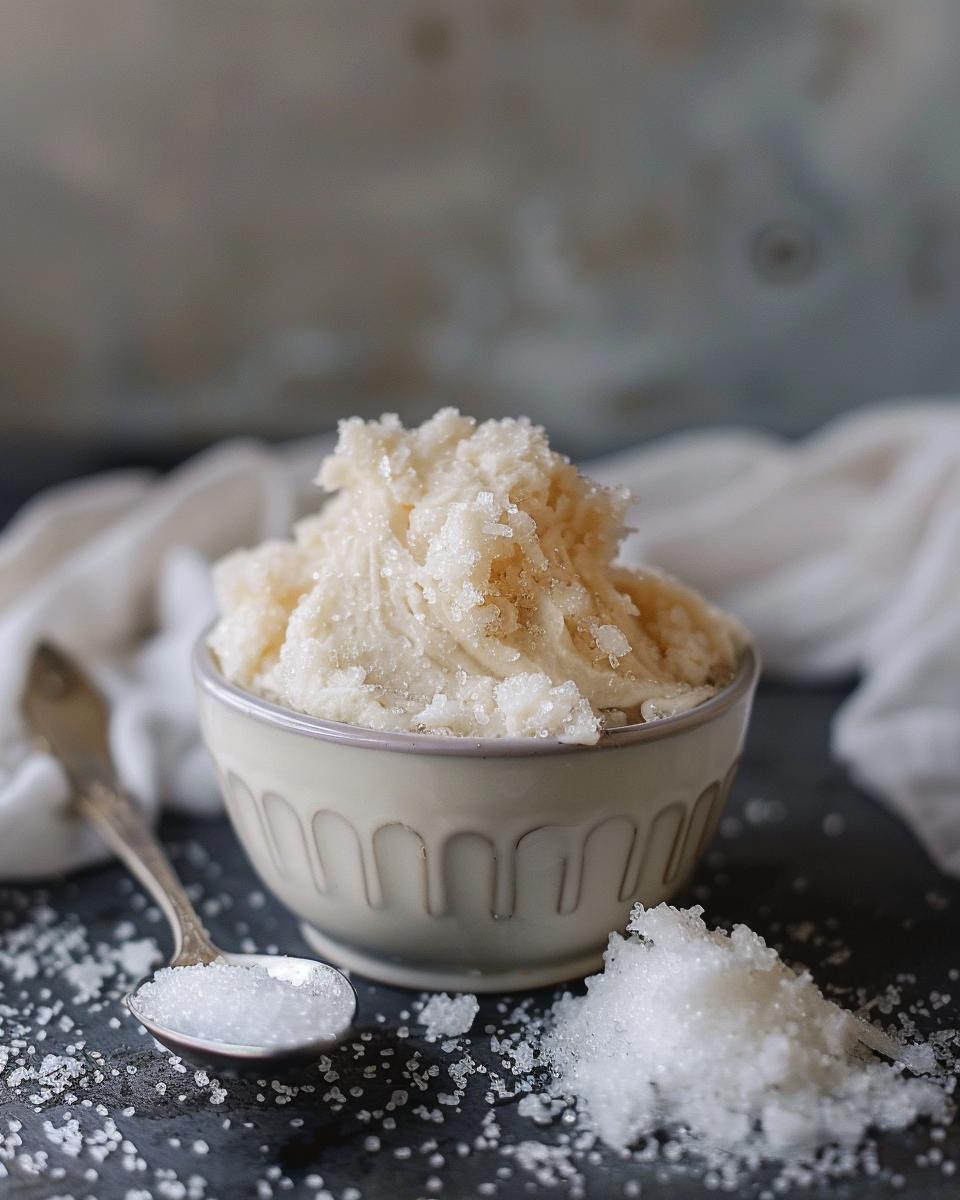
- Whip It Up: Transfer the mixture to a mixing bowl of a stand mixer or use a hand mixer. Whip the mixture on high speed until it begins to look creamy and fluffy.
Customizing Your Scrub
As you whip the scrub, you might wonder how to tailor it to your personal preference. Here’s how:
- Check the Texture: After about 5-7 minutes of whipping, check the texture. If it’s too stiff, add a bit more oil; if it’s too loose, add a little more sugar. This step is crucial for achieving the foaming body scrub how-to consistency that feels best on your skin.
- Add Fragrance: If you want your scrub to have a specific scent, now is the time to add a few drops of your favorite essential oil. Mix well to distribute the fragrance evenly.
- Final Whipping: Continue to whip the mixture for an additional 2-3 minutes. This ensures that everything is thoroughly combined and that the scrub is light and airy.
With these steps, your luxurious whipped scrub is ready to use! It’s perfect for a pampering spa day at home. Remember, this scrub not only cleanses but also moisturizes, thanks to the rich oils and honey. Who knew achieving glowing, smooth skin could be so simple and enjoyable?
Serving and Storing Your Whipped Sugar Scrub
Now that you’ve mastered the art of creating your own whipped sugar scrub with our easy-to-follow directions, let’s discuss how to maximize its benefits through proper serving and storage. This homemade beauty product not only provides a sense of accomplishment but also enhances your skincare routine.
Firstly, how to use sugar scrub effectively starts with applying a small amount to damp skin. Gently massage in a circular motion to allow the granules to exfoliate dead skin cells, then rinse off with warm water. This simple ritual leaves your skin feeling refreshed and silky smooth. Additionally, customizing the texture and fragrance during the mixing process means that each time you use it, the experience is uniquely tailored to your preferences.
Optimal Storage Tips for Your Scrub
When it comes to storage tips for homemade beauty products, ensuring the longevity of your whipped sugar scrub is key. Store your scrub in eco-friendly scrub packaging, such as a glass jar with a tight seal, to maintain its freshness and prevent contamination. Keeping it in a cool, dry place, preferably the refrigerator, can further extend its shelf life, allowing you to enjoy your scrub for up to two weeks.
Remember, homemade beauty products like this scrub do not contain preservatives, so proper storage is crucial to avoid spoilage. Are you using the best practices for storing your skincare products?
Embracing these simple yet effective tips will ensure that your homemade sugar scrub remains as delightful and effective as the day you made it. Whether you’re gifting it or indulging in a spa-like experience at home, the right storage solutions make all the difference. Have you tried experimenting with different scents and ingredients in your scrubs? Share your experiences and favorite combinations!

Pro Tips for Your Whipped Sugar Scrub Recipe
- Start with room temperature coconut oil for easier mixing.
- Gradually add sugar to control the scrub’s consistency.
- For extra fluffiness, whip for at least 7 minutes.
- Use essential oils for added fragrance and skin benefits.
- Moreover, experiment with different sugars for varying textures.
- Always store in airtight containers to retain freshness.
- Additionally, keep scrubs in a cool, dry place to prevent melting.
- Finally, label your scrub with the date made for best usage tracking.
FAQs: Enhancing Your Whipped Sugar Scrub Experience
Have you ever wondered how to tailor your whipped sugar scrub to better suit your needs or the changing seasons? Let’s dive into some of the most common questions, providing you with expert insights to elevate your skincare routine.
Ingredient Substitutions and Their Effects
Can I replace coconut oil with another oil in my scrub? Absolutely! For a lighter feel, almond oil is a great option, maintaining the moisturizing quality while not feeling too heavy. For those with acne-prone skin, jojoba oil can be a wonderful alternative, as it closely mimics the skin’s natural oils.
What are the best ingredients for a body scrub if I have sensitive skin? If your skin is sensitive, opt for fine sugar or oatmeal as the exfoliating agent. These ingredients are gentler than coarser sugars and salt. Also, consider adding aloe vera or chamomile essential oil for their soothing properties.
Cost-Effective Skincare Solutions
How can I save money while making my sugar scrubs? Buying your base ingredients in bulk can lead to significant savings. Also, consider using seasonal fruits and herbs that you can purchase at a lower cost or even grow at home, which can add a delightful twist to your scrub without breaking the bank.
Are there seasonal recipes that can help utilize more economical ingredients? Definitely! For instance, a peppermint sugar scrub during the winter season uses peppermint, which is abundant and inexpensive during those months. This not only saves money but also aligns your skincare regimen with the festive spirit.
Incorporating these tips and ingredient replacement options into your routine can lead to a more personalized and cost-effective skincare practice. Remember, the best skincare is the one that fits your needs and preferences while also being kind to your wallet!