Pumpernickel Bread Recipe: Unlock the Secret to Perfect Loaves
Ever wondered how to make the perfect pumpernickel bread? You’re in the right place! This pumpernickel bread recipe will guide you through each step, ensuring a delicious and aromatic loaf every time. Say goodbye to store-bought bread and hello to homemade goodness.
In this recipe:
- Ingredients and measurements
- Step-by-step instructions
- Tips for the perfect loaf
- FAQs for troubleshooting
Making pumpernickel bread at home may seem daunting, but it’s easier than you think. With the right ingredients and a bit of patience, you can bake a loaf that’s both flavorful and wholesome. Plus, the satisfaction of creating your own bread is unmatched.
If you’re a fan of sourdough, you might also enjoy our sourdough starter recipe. It’s a game-changer for any home baker. Additionally, for those with a sweet tooth, check out our take on the Cheesecake Factory’s brown bread. It’s the perfect complement to any meal.
Ready to unlock the secret to perfect pumpernickel bread? Let’s get started!

Who Can Make This Recipe and What You Need
This easy pumpernickel bread recipe is perfect for beginner to intermediate bakers. You don’t need to be a professional chef to create a delicious homemade pumpernickel loaf. If you have some experience with basic bread-making, you’ll find this recipe straightforward and rewarding. And even if you’re new to baking, the detailed steps will guide you through the process with ease.
Essential Tools and Equipment
Before you start making pumpernickel with rye flour, gather the following kitchen tools and equipment:
- Large mixing bowl
- Small bowl for activating yeast
- Measuring cups and spoons
- Wooden spoon or dough whisk
- Baking sheet lined with parchment paper
- Plastic wrap or a damp towel for covering the dough
- Cooling rack
These basic tools are likely already in your kitchen. If not, they are easy to find at any kitchen supply store.
Estimated Time Commitment
The total time required for this recipe includes both preparation and baking. Here’s a quick breakdown:
- Preparation: 25-30 minutes
- First Rise: 1-2 hours
- Shaping and Proofing: 30-45 minutes
- Baking: 35-40 minutes
- Cooling: At least 1 hour
In total, you’ll need about 3-4 hours from start to finish. Most of this time is spent waiting for the dough to rise and bake. This gives you the perfect opportunity to relax or get other kitchen tasks done.
If this sounds like the perfect bread recipe for you, check out Food & Wine’s guide for more tips and variations on making pumpernickel bread.
Ingredients Needed for Pumpernickel Bread
Now that we’ve covered the minimal equipment needed, let’s transition to the heart of our pumpernickel bread recipe—the ingredients. Choosing the right ingredients is crucial for achieving that perfect, rich flavor and texture unique to pumpernickel bread. Let’s dive into what you’ll need.
The Essentials
- 1 cup (200g) rye flour: This flour gives the bread its distinctive dense texture.
- 1 cup (200g) all-purpose flour: To balance the density of rye flour and provide structure.
- 1/2 cup (100g) caraway seeds: Essential for that traditional pumpernickel flavor. If you’re making a pumpernickel recipe with caraway seeds, this is a must.
- 1/4 cup (50g) brown sugar: Adds a touch of sweetness and helps with the bread’s color.
- 1/4 cup (50g) molasses: Provides deep, dark color and rich flavor. A key ingredient in any dark rye recipe.
- 1/2 teaspoon active dry yeast: The leavening agent that helps the bread rise.
- 1 teaspoon salt: Enhances flavor and helps control yeast activity.
- 1 cup (240ml) warm water: Activates the yeast and binds the ingredients together.
- 1 tablespoon (15ml) dark rye syrup (optional): For an even richer, darker loaf.
Each ingredient plays a vital role in creating the perfect loaf of pumpernickel bread. For instance, the combination of rye and all-purpose flours ensures the right balance of density and structure. The caraway seeds add that classic pumpernickel flavor, while molasses and brown sugar contribute to the bread’s deep, complex taste.
Wondering about substitutions? If you can’t find dark rye syrup, molasses is a great alternative. For a twist, you could use honey instead of brown sugar, although it will slightly alter the flavor profile.
Ready to gather your ingredients? Great! Let’s move on to the next step in our pumpernickel bread-making journey.

Step-by-Step Guide on How to Make Pumpernickel Bread
Now that you’ve gathered all the ingredients, it’s time to dive into the process of making this delicious traditional German pumpernickel bread. Follow these simple yet detailed steps to create an authentic pumpernickel bread that will impress your family and friends.
Step 1: Activate Yeast
In a small bowl, combine warm water and yeast. Stir gently to dissolve the yeast completely. Let it sit for 5-10 minutes until it becomes frothy and bubbly. This step is crucial for making pumpernickel bread with yeast.
Step 2: Mix Dry Ingredients
In a large mixing bowl, combine rye flour, all-purpose flour, caraway seeds, brown sugar, and salt. Mix these dry ingredients thoroughly to ensure an even distribution of flavors.
Step 3: Combine Wet and Dry Ingredients
Add the activated yeast mixture and molasses to the bowl of dry ingredients. Mix until a shaggy dough forms. Don’t worry if it looks a bit messy; this is normal for authentic pumpernickel bread.
Step 4: Knead the Dough
Transfer the dough to a floured surface. Knead it for 10-15 minutes until it becomes smooth and elastic. If the dough feels too sticky, sprinkle a little more flour onto the surface. Kneading is essential to develop the gluten structure in the bread.
Step 5: Ferment the Dough
Place the kneaded dough in a greased bowl. Cover it with plastic wrap or a damp towel. Let it ferment in a warm, draft-free place for 1-2 hours or until it doubles in size. This step is crucial for developing the rich flavors of traditional German pumpernickel bread.
Step 6: Shape the Dough
Punch down the fermented dough to release any air bubbles. Shape it into a round or oblong loaf, depending on your preference. Place the shaped dough on a baking sheet lined with parchment paper.
Step 7: Proof the Dough
Cover the dough again with plastic wrap or a damp towel. Let it proof for another 30-45 minutes until it slightly puffs up. Proofing helps achieve the perfect texture in your pumpernickel bread with yeast.
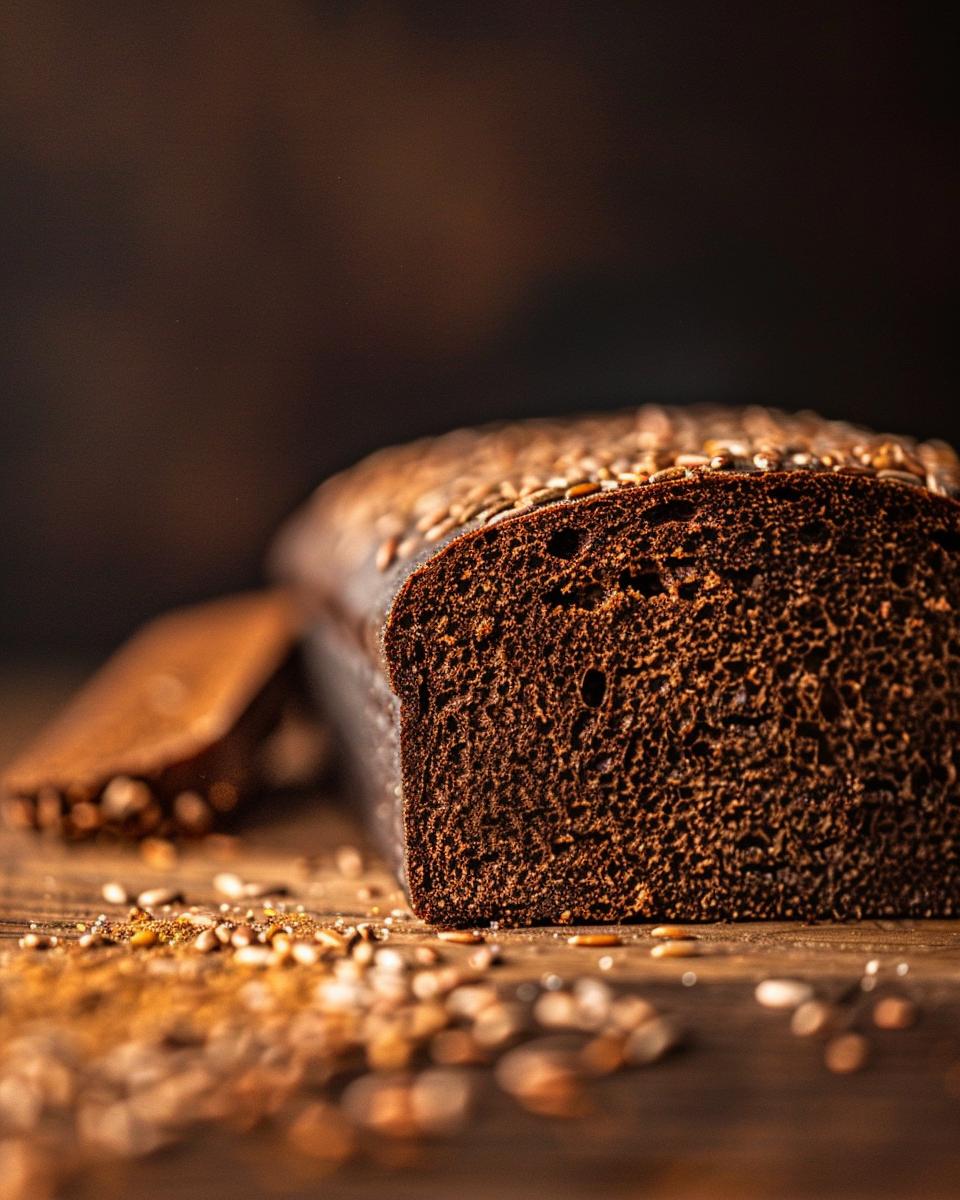
Step 8: Bake the Bread
Preheat your oven to 375°F (190°C). Bake the bread for 35-40 minutes until it turns dark brown and sounds hollow when tapped on the bottom. This baking process will give your bread its characteristic crust and deep flavor.
Step 9: Cool the Bread
Allow the freshly baked bread to cool on a wire rack for at least 1 hour before slicing. This cooling period helps the bread set and makes slicing easier.
Enjoy your homemade authentic pumpernickel bread with butter, cheese, or any topping of your choice. Happy baking!
Serving and Storing Ideas and Tips
Now that you’ve successfully followed the step-by-step guide to creating your delicious pumpernickel bread, it’s time to discuss how to serve and store it. This homemade pumpernickel bread recipe is accessible for all levels, requiring minimal cooking knowledge and experience.
From activating the yeast to baking the loaf, you’ve mastered each step. You’ve learned the tips for kneading and shaping the dough, along with key guidance on proofing and fermenting. Let’s dive into the best ways to enjoy and preserve your whole grain pumpernickel masterpiece.
Serving Your Pumpernickel Bread
Enjoy this versatile bread in various ways. Serve it warm, straight from the oven, or let it cool to room temperature. Toasted slices make an excellent base for savory toppings like smoked salmon, cream cheese, or a simple spread of butter. For a sweet treat, try it with honey or jam.
This bread pairs well with hearty soups and stews, making it a great addition to any meal. Consider using it to make sandwiches, offering a unique twist with its robust flavor. The possibilities are endless, and each bite is sure to be a delight!
Storing Your Pumpernickel Bread
To keep your pumpernickel bread fresh, store it in an airtight container at room temperature. This will maintain its texture and flavor for up to three days. If you need to store it for longer, wrap it tightly in plastic wrap or aluminum foil and freeze it.
When freezing, slice the bread first. This makes it easy to grab only what you need without thawing the entire loaf. To enjoy, simply reheat slices in a toaster or oven until warm.
With these tips, your pumpernickel bread will stay as delicious as the day it was baked. Enjoy exploring different pumpernickel bread uses and savor the rich flavors of your homemade creation!

Pro Tips for Making Pumpernickel Bread
- For a richer flavor, always use high-quality rye flour.
- To enhance texture, add a tablespoon of dark rye syrup.
- Always let the dough ferment in a warm, draft-free place.
- For a crispier crust, preheat your oven to 425°F initially.
- Use caraway seeds for an authentic pumpernickel bread recipe taste.
- For easier kneading, flour your hands and the work surface.
- After baking, cool the bread on a wire rack to avoid sogginess.
- To store, wrap the bread tightly in plastic wrap or foil.
- Freeze any leftover bread to keep it fresh for months.
- When reheating, use an oven instead of a microwave.
FAQ
Have questions about making the best pumpernickel bread? You’re not alone! Here are some of the most frequently asked questions:
Ingredients and Substitutions
Q1: Can I make gluten-free pumpernickel bread?
Absolutely! Substitute rye flour with a gluten-free flour blend and ensure your other ingredients are gluten-free. Note that the texture may differ slightly, but the flavor should remain rich and hearty.
Q2: Can I use a sourdough pumpernickel starter instead of yeast?
Yes, you can! Using a sourdough starter will give your bread a tangy flavor. Replace the yeast with 1 cup of active sourdough starter and adjust the water and flour to achieve the right dough consistency. For a detailed guide, check out this sourdough pumpernickel recipe.
Q3: What are some money-saving tips for sourcing ingredients?
Buy ingredients like rye flour and caraway seeds in bulk from local health food stores or online retailers. Look for sales or discounts, and consider joining a local co-op to save on high-quality ingredients.
Troubleshooting and Tips
Q4: My bread didn’t rise properly. What went wrong?
This could be due to inactive yeast or too cool rising conditions. Ensure your water is warm but not hot (about 100°F/38°C) and let the dough rise in a warm, draft-free place. If using a sourdough starter, make sure it’s active and bubbly.
Q5: How can I make my bread crustier?
For a crustier loaf, bake at a higher temperature initially. Preheat your oven to 425°F (220°C) and bake for the first 15 minutes, then reduce the heat to 375°F (190°C) for the remaining time. Adding steam to your oven during the first 10 minutes can also help create a crusty exterior.
Want to dive deeper? Check out this pumpernickel bread recipe for more tips and variations!