Cheong Syrup Recipe Unveiled: Transform Your Desserts with This Guide
Have you ever wondered how to elevate your desserts with a unique twist? The secret lies in a special ingredient – cheong syrup. Today, we’re unveiling an easy-to-follow cheong syrup recipe that will transform your sweet treats into culinary masterpieces. Not only is it simple, but the rich flavors will leave your guests asking for more.
In this recipe:
- Step-by-step guide to making cheong syrup
- Tips for incorporating it into various desserts
- Ways to customize the recipe to your taste
Moreover, if you’re looking to expand your Asian-inspired culinary repertoire, don’t miss our guide on Korean Soy Garlic Sauce. It’s a game-changer for savory dishes. And for those who love a good curry, our Trader Joe’s Thai Curry Recipe is a must-try. Both recipes pair beautifully with desserts featuring our cheong syrup, creating a full dining experience that’s both flavorful and harmonious.
So, are you ready to discover the magic of cheong syrup in your desserts? Let’s dive into the recipe and start creating unforgettable sweet moments!

Who Can Make Cheong Syrup?
So, you’re intrigued by the idea of crafting your very own cheong syrup? Wondering if it’s within your culinary grasp? The good news is, making cheong syrup is surprisingly straightforward. Whether you’re a seasoned chef or a curious novice in the kitchen, the best cheong recipe is designed for everyone. But, what do you need to embark on this flavorful journey?
Essential Tools and Equipment
First off, gathering the right tools and ingredients is key. For a basic Korean cheong recipe, you’ll need:
- A large pot for simmering your chosen fruits
- A fine mesh strainer or cheesecloth for filtering
- Clean jars or bottles for storage
Indeed, the simplicity of the equipment needed makes this an accessible adventure for all. Now, let’s talk about the process itself.
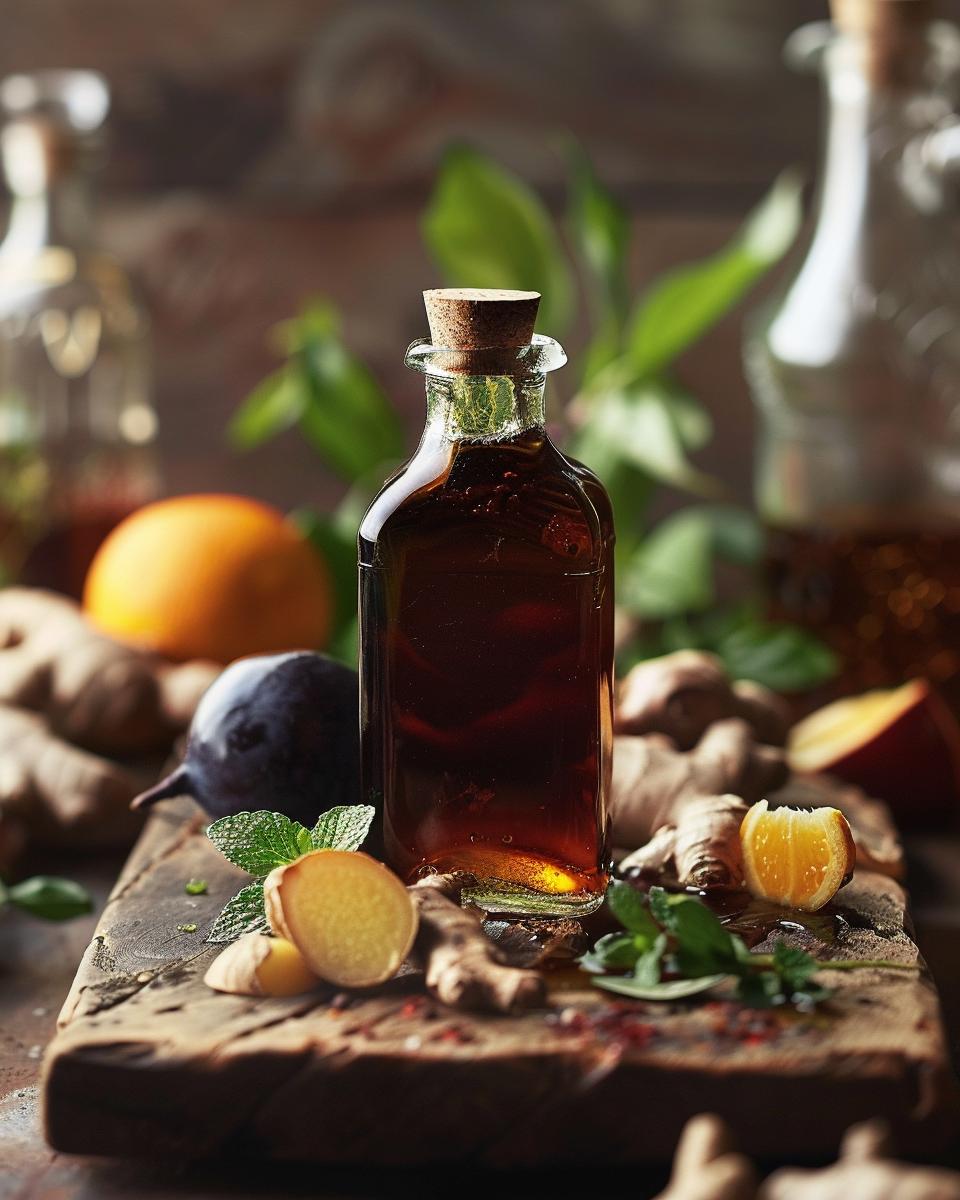
At its core, creating cheong syrup involves simmering fruit with sugar and water, then straining it to achieve a rich, concentrated syrup. This process is not only easy but also allows for a great deal of creativity. You can experiment with different fruits and adjust the sweetness to your liking, making each cheong syrup recipe uniquely yours.
However, before we proceed, let’s set some expectations regarding difficulty. While the process is straightforward, patience is key. The fruit needs time to release all its flavors, and the syrup must reach the perfect consistency. But don’t worry, even beginners have found success with the best cheong recipe selections, and so can you. For an easy start, check out a detailed guide at Stellan Spice on how to make Blueberry Cheong.
In conclusion, anyone with basic kitchen tools and a bit of patience can make cheong syrup. Whether you’re looking to impress your guests or simply enjoy a homemade treat, the journey of making cheong syrup is rewarding and, most importantly, delicious.
Ingredients Needed for Cheong Syrup
Now that we’ve covered the equipment, let’s dive into the heart of our cheong making: the ingredients. The key to a sublime cheong lies not just in the method, but in the quality of what goes into it. Ever wondered why some homemade syrups taste heavenly? It’s all in the choice of ingredients. So, let’s ensure your cheong stands out for all the right reasons.
Choosing Your Ingredients Wisely
First things first, what do you need? Here’s a rundown:
- 1 cup of water
- 1 cup of granulated sugar
- 2 cups of your chosen fruit (strawberry, blueberry, lemon, peach)
The quality of fruit is paramount. For a delightful strawberry cheong syrup recipe, select ripe, juicy strawberries. The same goes for a blueberry cheong recipe—plump, fresh blueberries make all the difference. Considering a lemon cheong recipe? Choose bright, firm lemons. And for a peach cheong recipe, ripe, aromatic peaches are your best bet.
Why not go organic? Organic fruits not only taste better but are also better for our planet. And if you can source them locally, even better! This supports local farmers and reduces your carbon footprint. A win-win, right?
Incorporating these ingredients ensures a cheong that’s not just delicious but also a reflection of your commitment to quality and sustainability. So, ready to get started? Your perfect cheong awaits!

Step-by-Step Guide to Making Cheong
Now that we’ve got all our ingredients ready, let’s dive into the exciting part: making cheong! Have you ever wondered how to turn those fresh fruits into a delicious syrup? Well, you’re about to find out. The process is simpler than you might think, and with a few tips and tricks, you’ll be creating cheong with perfect consistency and flavor in no time.
First off, prepare your fruit. Depending on what you’re using, this could mean washing and cutting. For example, for blueberry cheong, you’ll want to ensure the berries are clean and sorted. Remember, the quality of your fruit directly impacts the blueberry cheong benefits.
Let’s Get Cooking
- Place your prepared fruit in a large pot and add just enough water to cover the fruit. This helps in extracting the flavor without diluting it too much.
- Add sugar to the pot. The general rule is a 1:1 ratio of sugar to fruit, but feel free to adjust based on your sweetness preference and the natural sweetness of the fruit.
- Bring the mixture to a boil, then reduce the heat and let it simmer. Here’s where patience comes in. You’ll want to simmer until the fruit is soft and the liquid starts to thicken. This could take anywhere from 30 minutes to an hour.
- Once you’ve achieved the desired consistency, remove the pot from the heat. If you’re aiming for a smoother syrup, you can strain the mixture to remove fruit pieces.
- Let the cheong cool down before transferring it to sterilized jars. Store in the refrigerator to keep it fresh.
And there you have it! Whether you’re exploring lemon cheong uses or enjoying the health benefits of blueberry cheong, the possibilities are endless. Remember, you can adjust the recipe for different fruit types, so don’t be afraid to experiment. What will you try next?
Serving and Storing Ideas for Cheong Syrup
Now that you’ve mastered the art of making cheong, let’s talk about how to serve and store it. Whether you’ve chosen to make a classic blueberry cheong or ventured into other fruits, these tips will ensure your syrup is always at its best. So, how do you transition from cooking to enjoying? Let’s dive in.
Maximizing Flavor and Freshness
First off, serving cheong syrup at the right temperature can make a world of difference. Have you tried drizzling it over pancakes or swirling it into yogurt? The rich, concentrated flavor enhances just about anything it touches. But, remember, balance is key. Too much can overpower your dish, so start with a little and adjust to taste.
Now, onto storage. The cheong syrup shelf life is something you might wonder about. Thankfully, if stored properly, your syrup can last for 1-2 months in the refrigerator. Just make sure it’s in a clean, airtight container. But what if you’ve made too much? No problem. Cheong freezes beautifully. Pour it into an ice cube tray for easy, portion-sized use later on.
What about substitutions? If you’re out of your favorite fruit, don’t fret. A cheong syrup substitute can be as simple as swapping in another fruit. Just keep in mind, the consistency and cooking time may vary. For example, blueberry cheong how long will it last compared to a strawberry version? Typically, they’re quite similar, but always check for freshness before use.
In conclusion, with these serving and storing tips, your cheong syrup will not only taste great but will also last, allowing you to enjoy the fruits of your labor (pun intended) for weeks to come. So, why not experiment with different fruits and find your family’s favorite?

Pro Tip: Mastering Cheong Syrup Recipe
- Firstly, choose ripe fruits for a richer flavor profile.
- Secondly, always use a clean, dry jar to prevent mold.
- Moreover, stir gently to keep the fruit’s shape intact.
- Also, for a thicker syrup, reduce the mixture on low heat.
- Importantly, cool the cheong syrup before sealing the jar.
- Additionally, label jars with the date for tracking shelf life.
- Finally, experiment with different fruits to find your best blend.
FAQs Around Making and Using Cheong Syrup
Have you ever wondered about the cheong syrup pronunciation or the secrets behind a delicious Korean syrup cheong? Well, you’re not alone! Let’s dive into some of the most frequently asked questions about making and using this delightful syrup.
Common Queries on Making Cheong
Can I replace some ingredients when making cheong syrup? Absolutely! While traditional recipes like the maesil cheong recipe are time-tested, don’t hesitate to experiment with local fruits or alternative sweeteners. It’s all about finding the right balance that suits your taste.
Any money-saving tips for homemade cheong syrup? Indeed! Buying fruits in bulk during their peak season can significantly reduce costs. Moreover, consider using less refined sugars or honey for a more economical yet equally tasty version.
What should first-time cheong makers know? Patience is key! The flavors develop and meld over time, so give your cheong syrup space to mature. Also, don’t be afraid to try advanced variations, like adding herbs or spices for an extra flavor kick.
Using Cheong Syrup
How do I incorporate cheong syrup into my dishes? Cheong syrup is incredibly versatile. Drizzle it over pancakes, mix it into cocktails, or use it as a sweetener in your tea. The possibilities are endless!
Where can I find more cheong recipes? For more inspiration, check out this collection of cheong recipes. You’ll find exciting ways to use your homemade syrup in everyday dishes and drinks.